Adding agent profiles to your office account will allow you to route leads to them, give them access to their own Control Panel where they can see their own leads and listings, and will create an agent bio page.
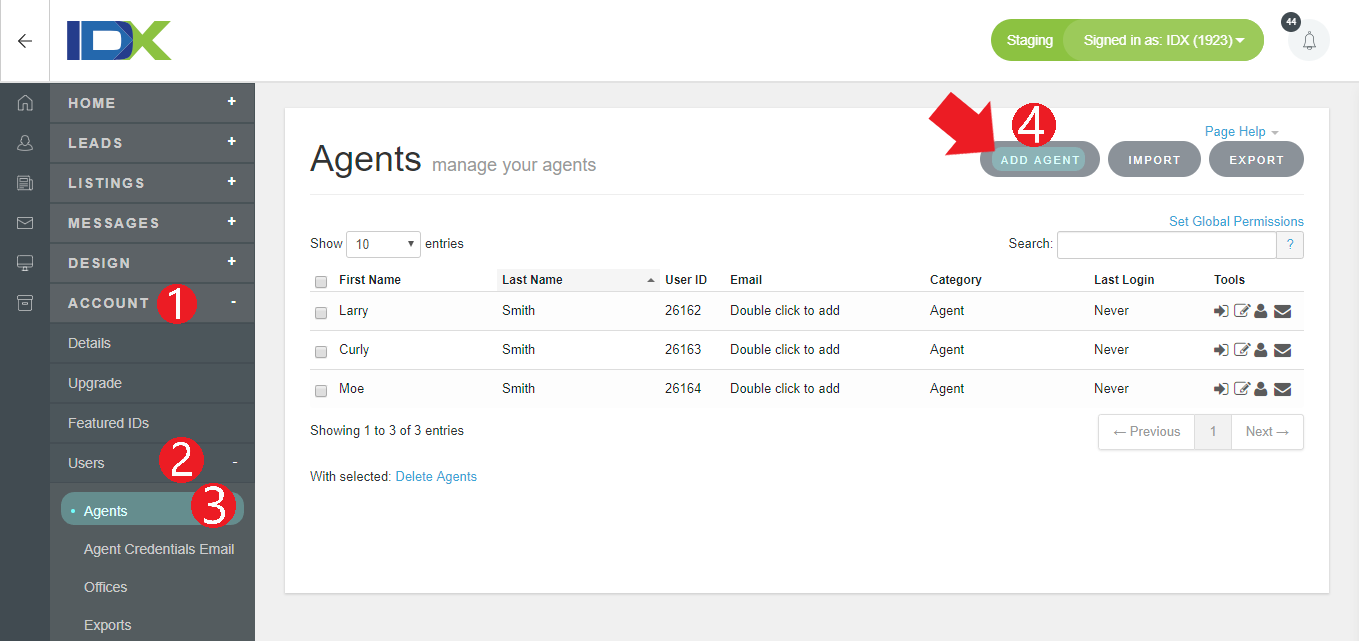
To add a new agent to your office account, click Account in the main menu, Users in the submenu, then Agents. From there, click Add Agent in the upper-right corner.
There are several tabs to control aspects of the new agent profile you are creating.
When you are finished with each section, click Save Changes at the bottom of the screen. Your new agent will be saved in your account under Account -> Users -> Agents.
Account/Contact
Create a Username and Password for your agent so that they can log into their own IDX Control Panel.
Contact Information can be added yourself or you can let the agent enter it from their own Control Panel once you've sent them their new login information. Make sure you have the correct Primary Email address entered in, since this email address is where your agent will receive new lead notifications.
SMS Alerts allow any of your agents to receive SMS messages for any leads that they receive. Click Yes under Opt-In, then enter the phone number where the agent wants to receive notifications and click Save Changes. An SMS message should come through from the system to notify the agent that they are opted in for lead notification.Bio Information will show up on the agent's Bio Page near their contact details. This is typically a place to introduce the agent's background, or market their skills and experience. Images can be added as well as embedded YouTube videos. The agent can add this information as well from their own Control Panel.
Office
This tab will only be displayed if you have created at least one office profile in the Offices section. Add your agent to the appropriate office. This will govern the organization of the Roster page.
Photo
Add a photo for the agent from this tab. You can enter a URL to a photo hosted on the Internet, or upload a photo from your local computer. Uploads need to be less than 1mb in size. See this article for adding a bio photo.
MLS
In this tab you will connect the agent profile with the correct agent data from the MLS. Simply use the drop-down to find the agent's name. If there are no agent names to choose from see this article for information about your Featured IDs.
Connecting your agent profile to the MLS agent data will pull in the agent's active listings from the MLS to their Bio Page.
Sub-Header
Adding content to the subheader here will place that subheader on the top of the agent's Bio Page.
Here you will also find the agent's Agent Header ID code. See this article to add an Agent ID to any page.
Permissions
This tab lets you determine what level of control your agent will have over their own profile.
See this article to set agent permissions.
Roster
Here you can choose whether or not this agent will be included in the Roster page. You can also enter their own personal website URL, if they have one.
If you select "Redirect to Personal Website" then the link from the Roster page will bypass their Bio Page altogether and go straight to their personal website URL.
See this article for more information.
Property Update
Here you can control how the email updates look which are sent out to the leads that are assigned to this agent.
CC on Emails controls what type of report the agent will receive about Email Updates sent to their leads. "Summary" is a maximum once-daily email with a full report of all emails sent. "Individual" is a copy of each individual email update sent to each lead.
See this article for more information.
Languages
Select which languages this agent speaks to be displayed on your Roster page.
Login Information
To send your agent their login information go to the Agent Management section and click on the envelope tool
