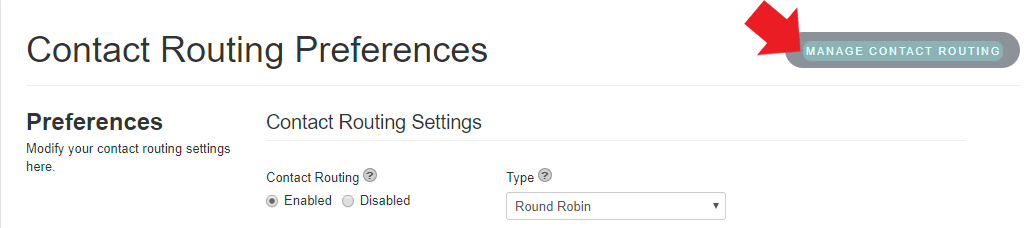
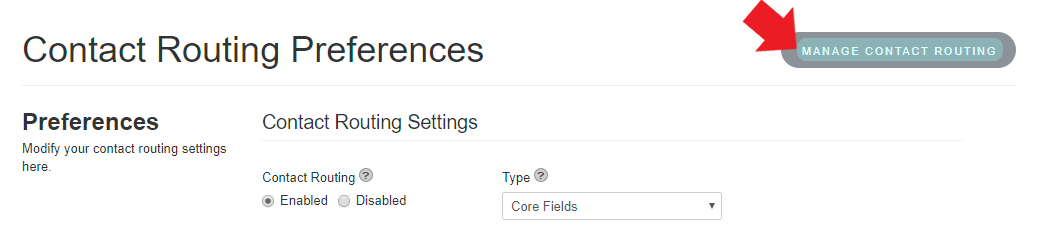
Contact routing options are available in IDX Broker Office accounts under Leads in the main menu, and Contact Routing in the sub menu. You can adjust your Contact Routing Preferences on the page you are currently on, or you can click Manage Contact Routing to manage your contact routing rules.
Round Robin Contact Routing
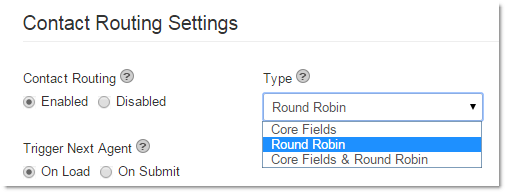
A round-robin list will route your leads to your Agents in the order of your list. To set up round-robin contact routing, go to the Contact Routing Preferences page and then set the Type drop-down menu to Round Robin. Click Save Changes at the bottom of the screen.
Then click the Manage Contact Routing link in the upper right corner of this screen.
In the right column, you will see a list of agents you have set up on your account. To add an agent to your round-robin List, put your cursor over the agent's name, and click the plus sign.

Once you have added your agents to your round-robin list, you can re-order them by clicking the icon to the left of their name, and dragging and dropping them into the order you would like. You can also use the red X to the right of their name to remove any unwanted agents from the list.
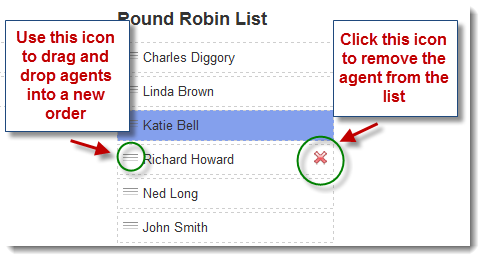
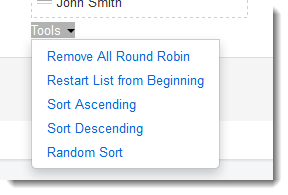
You can also use the Tools dropdown menu to quickly re-sort your round-robin list.
When you are finished, click Save Changes.
Core Fields Contact Routing
Core fields contact routing can route leads to your agents based on geography, price, etc. To set up core fields contact routing, go to the Contact Routing Preferences page, and then set the Type drop-down to Core Fields. Click Save Changes at the bottom of the screen.
Then click the Manage Contact Routing link in the upper right corner of this screen.
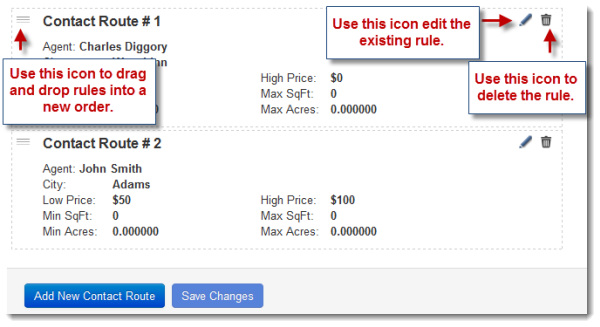
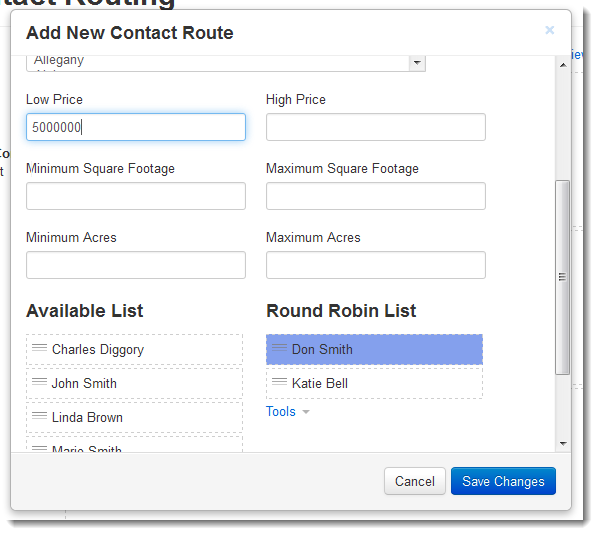
By default, core fields contact routing will route any leads that fill out a contact form on a Featured Listing to the listing agent. All other leads will come in as "unassigned" and will be sent to the primary account holder. In addition to lead routing for Featured Listings, you can add more contact routing rules by clicking the Add New Contact Route button on this screen. A pop-up window will appear that will allow you to choose search criteria like city, price, MLS, etc. and assign an agent to your contact routing rule. Click Save Changes when you are done. Once a contact routing rule is saved, any leads that come in that fit it's criteria will be automatically assigned to the agent specified in the rule.

You can manage existing contact routing rules as well. Use the icon to the left of the rule name to drag and drop your rules into a new priority order. Use the trash can icon on the right to delete any contact routing rules you no longer need. You can also use the pencil icon to edit criteria for an existing rule.
Combined Core Fields & Round-Robin Contact Routing
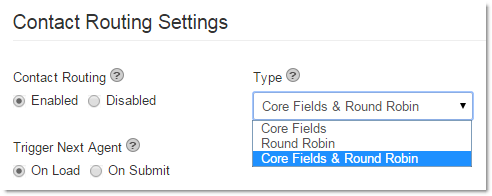
You can also set up your contact routing using a combination of core fields rules and a round-robin list. To set this up, go to the Contact Routing Preferences page, and then set the Type drop-down to Core Fields & Round Robin. Click Save Changes at the bottom of the screen.
 Then click the Manage Contact Routing link in the upper right corner of this screen.

On this screen, click Add New Contact Route. You will see a pop-up appear that you can use to set up a contact routing rule. As you can see, you have the option of setting up a core fields route or round-robin list as described in the previous step. You can also combine round robin lists with core fields. You can set up as many rules as you would like, and manage them using the steps outlined in the round-robin and core fields sections above.
Additional Contact Routing Preferences
By clicking the Manage Contact Routing button, you have several options you can use to fine tune how your lead routing works. Below is an explanation of each option available to you.
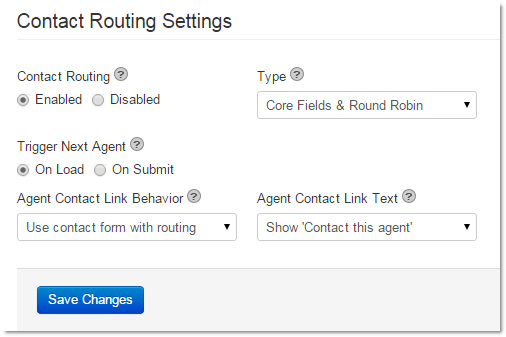
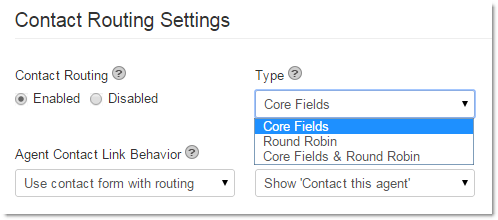
- Contact Routing Enabled/Disabled - Leave this option on Enabled if you are planning to use contact routing. If you do not want to use contact routing and would like ALL lead notifications to be sent to the primary email address on the account, switch this option to Disabled.
- Type - Choose which contact routing method you would like to use. Each is described in the sections above.
- Trigger Next Agent -This option is used if you have Round Robin contact routing setup. You can choose to have your round robin list advance to the next agent in line after a form is loaded on any site visitors web browser, or after a contact form is submitted. Setting this option to On Submit will eliminate any agents getting "skipped" in your list.
- Agent Contact Link Behavior -This gives you the option of bypassing the IDX lead management system and using direct email links instead. Note If you set this option to use mailto email links, any direct contact between leads and agents via these links WILL NOT be recorded in your IDX lead management area.
- Agent Contact Link Text - Specify whether you want to display generic "Contact this agent" text on the agent's bio page, or prefer to show the agent's email address.