Step 1 - Create CNAME Record on Nameserver
Log into your website host or domain registrar. This is probably whomever you purchased your domain name from.
Create a CNAME record pointing your subdomain address to 'subdomains.idxbroker.com' (without the quotes). Ensure you are using the value above, and NOT 'yourdomain.idxbroker.com'. Your CNAME is typically a short word, like search, or homes.
Here is help for some popular hosting services.
| GoDaddy.com | Host Gator | IONOS | Bluehost |
| Network Solutions | Yahoo Small Business | CloudFlare | Amazon Route 53 |
NOTE: It is recommended to wait one day between Step 1 and Step 2. This will give your new CNAME record time to propagate across the Internet.
Step 2 - Point your IDX Broker pages to the new location
Enter your new custom domain in your IDX Control Panel under Account > Details:

Here you will see a section called Subdomain/Domain Control. Your standard IDX subdomain is on the left and your Custom Domain settings are on the right.
Set Use Custom Domain to Yes.
Enter in the CNAME from step 1 into the Custom Domain field.

Considerations
- What is a Subdomain?-Read this article for an explanation of subdomains and how it can help your website.
- Why do my pages show up with -IDX Broker on a Google search? This is not something that IDX is adding to your page title, but rather a feature of Google when they encounter the default domain of .idxbroker.com. When you set up a subdomain for your IDX service, this should be corrected.
- How do I check if my CNAME is set up correctly?- Once you set the toggle to "Yes" and add your custom domain, you will see a notification about the status of your CNAME record. Any errors will show a red X and a message explaining the error. If your subdomain is setup properly, the domain field will flash green, and display a green checkmark with a success message.
- What about a "A" Name Record? - Because the set of IP addresses associated with IDX Broker can change over time, you should never create an "A" record with any specific IP address.
- What do I need to do after I switch over to a custom subdomain?- After switching to a custom subdomain, you'll need to make sure that you update any existing IDX links on your website or IDX global wrapper with your new IDX links using your custom subdomain. Typically, this can be accomplished with a find & replace.
- What about a www subdomain? If you're attempting to use "www" as your custom subdomain, you'll also need to verify that your own homepage continues to function. If you have been using the www prefix in other places, including what's on file for your IDX account, and then set up a different CNAME record, you may experience some website issues.
- Can I speed up indexing? Your IDX pages will now begin to be indexed organically by "Google Bot" and other search engine crawlers. If you would like to help Google find you faster, you can verify your ownership of the subdomain with Google Webmaster Tools. See this article for instructions about how to verify your subdomain.
- If you have any questions about the SEO value of a subdomain vs a subdirectory, see this article and video from Google here.
- Can I setup multiple subdomains? While you may setup and use multiple subdomains on your primary website, like blog. search. and support., IDX Broker only supports a single subdomain for our service. All of the IDX Broker pages will be housed under the subdomain specified in the account settings.
GoDaddy
- Log in to your account at dcc.godaddy.com.
- Click the DNS tab, then click Manage Zones. You'll be directed to the Domain Manager page.
- From the Domain Manager, select your domain name that has your IDX content from the list to access the Domain Settings page.
- Scroll down to the Additional Settings section and select Manage DNS.
- On the DNS Management page, at the bottom of the Records section, click Add.
- Select CNAME from the Type dropdown.
- Complete the required fields:
-
Host: Enter your subdomain here. For example, if you picked search.primarydomain.com as your address, enter
search. -
Points to: Enter
subdomains.idxbroker.com(NOT yourdomain.idxbroker.com) - TTL: Use the default setting (1 hour)
-
Host: Enter your subdomain here. For example, if you picked search.primarydomain.com as your address, enter
- Click Save to complete the process.
HostGator
- Log in to your HostGator cPanel.
- In the Domains section, click Simple DNS Zone Editor.
- Scroll down to Add a CNAME Record.
- In the Name section, enter your subdomain. For example, if you picked search.primarydomain.com as your address, enter
search. - In the CNAME section, enter
subdomains.idxbroker.com. (NOT yourdomain.idxbroker.com) - Click Add Record.
IONOS
- Log in to your account at IONOS and go to the Domains & SSL section.
- Next to the domain that has your IDX content, click the gear icon under Actions and select DNS.
- From the Domain Settings, click Add Record then select CNAME under Type.
- In the Hostname field, enter the name you would like to use as your CNAME, like
search. - In the Point to field, type
subdomains.idxbroker.comas the alias. (NOT yourdomain.idxbroker.com) - (Optional): Set the desired TTL.
- Click Save.
Bluehost
- Log in to your account at Bluehost.com.
- Click the Domains link at the Top of the account.
- Click the Zone Editor link.
- Scroll down to the heading named Add DNS Record.
- In the Host Record field, enter the desired record name, like search.
- Leave the TTL field at it's default setting.
- Select CNAME from the drop-down labeled Type.
- In the Points To field, enter
subdomains.idxbroker.com(NOT yourdomain.idxbroker.com) - Click the Add Record button.
Yahoo Small Business
- Log in to your My Services page.
- Click the Domain link.
- Locate the A and CNAME Records section then click the Add link.
- In the Source section, enter your subdomain. For example, if you want search.primarydomain.com as the address of your IDX content, enter
search. - In the Destination section, enter
subdomains.idxbroker.com(NOT yourdomain.idxbroker.com) - Click Add.
Network Solutions
- Manage your account at networksolutions.com.
- Select Manage All Services from the pulldown menu, and click Login.
- Click Manage Domain Names.
- Select the domain name to receive new DNS records and click Manage.
- Click Change Where Domain Points.
- Click Edit Advanced DNS.
- Under the Host Aliases: CNAME Records heading, click Add/Edit.
- In the Alias text box, enter your CNAME record (e.g. search).
- Select the radio button left of the Other Host box.
- In the Other Host field, enter
subdomains.idxbroker.com(NOT yourdomain.idxbroker.com) - Click Continue.
CloudFlare
- Log in to your account at CloudFlare.com.
- From the dropdown menu on the top left, select the domain that has your IDX content.
- Select the DNS settings tab.
- Add the CNAME record (eg. search) and have it point to
subdomains.idxbroker.com(NOT yourdomain.idxbroker.com) - Click the orange cloud to turn it grey. This makes it so that Cloudflare does not proxy the CNAME traffic to Cloudflare.
 Cloudflare CNAME Instructions
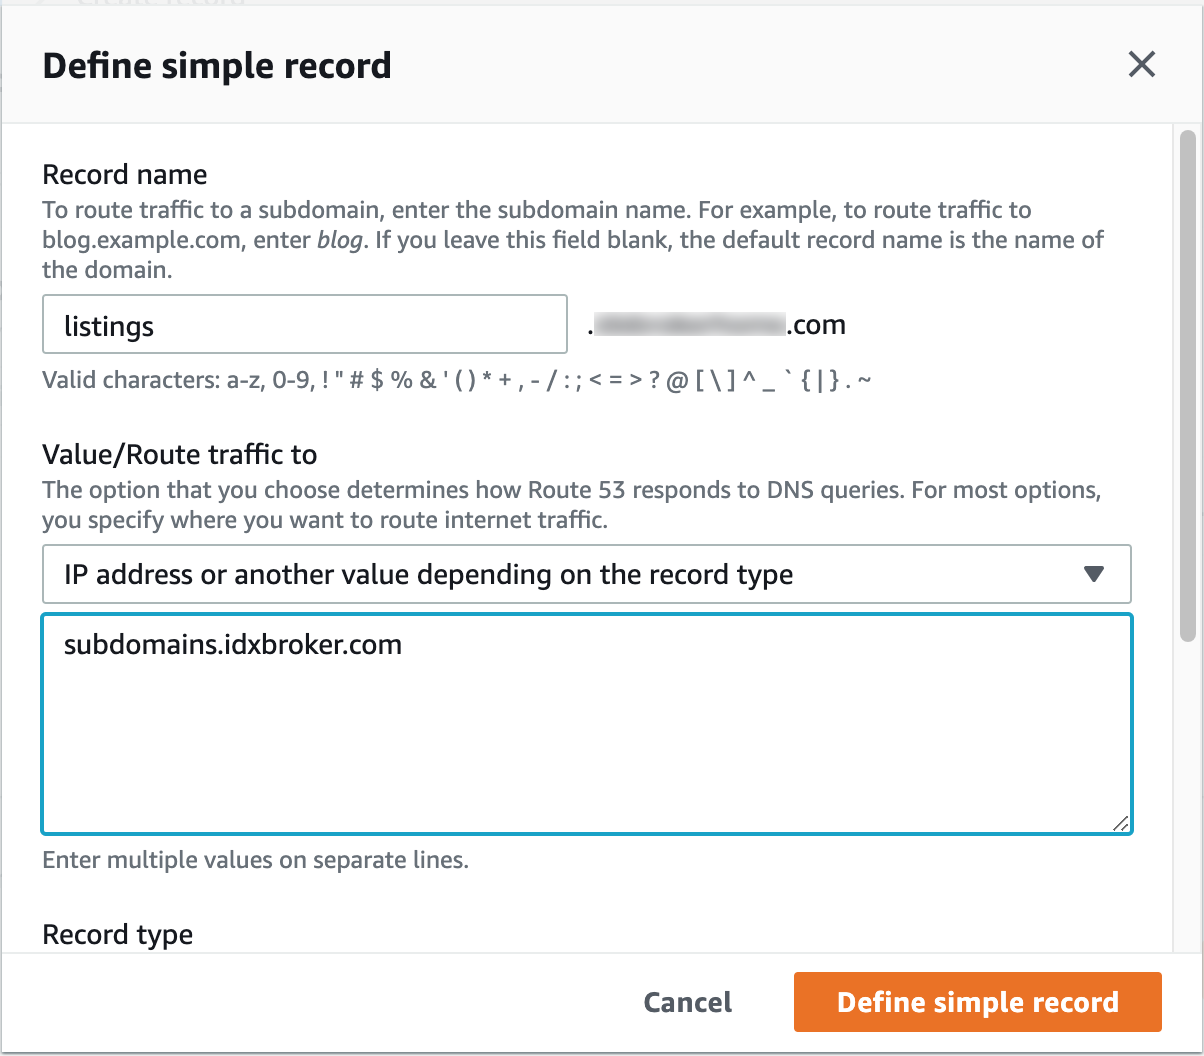
Amazon Route 53
- Log in to your AWS Management Console at AWS.
- From the Services dropdown menu on the top left, select Route 53.
- Click Hosted Zones, and select the domain with your IDX content
- Click Create Record -> Simple Routing -> Define Simple Record
- Record Name = Just the word you have chosen for your subdomain. (eg. homes | search | listings | oregon | homesearch)
- Value/Route traffic to:
- "IP Address or another value depending on the record type"
- subdomains.idxbroker.com (NOT yourdomain.idxbroker.com)
- Click Define Simple Record, and then Create records.
 AWS - Creating Records Instructions