The Showcase Widget is a tool you can put on your website that displays properties in a grid layout with minimal details. Each property in the Showcase Widget can be clicked, which will navigate to the details page for that listing.
1. Create a Property Showcase Widget
1.1 From your IDX Broker Control Panel, click Design -> Website -> Widgets. From there, click Create New in the upper-right hand corner.

1.2 Click on the "Select type of widget" button and select “Showcase” from the drop-down menu
2. Choose Properties to Feature
When creating a Showcase Widget you may choose from several property sets depending on if you want to display just your listings (or your office’s listings for Office Accounts), or general listings from the MLS feed.
My Listings or My Office’s Listings
-
Featured Properties - Displays any active listings where your Agent ID is marked as the primary listing agent by the MLS, or Office ID if you are subscribed to an Office Account. This property set will match the listings that show in the IDX Broker Control Panel under Listings -> Active.
-
Supplemental Properties - Displays any listings that you have manually added to your account under Listings -> Supplemental in the IDX Broker dashboard. Supplemental listings are listings that are not included in the data we receive from your MLS.
-
Featured + Supplemental - Displays both the Featured Properties and Supplemental Properties sets in the widget.
-
Featured Agent(s) Properties This option is only available for Team and Office Accounts. It limits the display listings to the active listings of one or more of the agents in your office where they are the primary listing agent. If you choose this option, you will be prompted to select the agent(s) whose listing you want to display

-
Sold/Pending Properties - Displays any sold or pending listings stored in your account. This includes listings found under Listings -> Sold Pending and any supplemental listings added with a status of sold under Listings -> Supplemental.
Listings from the MLS Feed
- Custom Search - Displays listings based on search criteria that you set. When this option is chosen, you will be prompted to select a search page with which to set criteria. This option is useful when trying to create widgets to display listings for a specific neighborhood, with a specific feature, within a price point, and so on. Click here to read the article about building a widget using Custom Search.
- Custom List - Build a property set using a list of MLS ID numbers. This is a good option if you want to display a very specific set of properties. The custom list is limited to a maximum of 25 listing IDs.
- Polygon Search - Using this Engage only feature allows you to define a specific area on a map to return only listings within that space. This option is ideal when the available search criteria is not detailed enough to display your desired listings. See this article for more information about how to use the Polygon Tool (start on Step 2).
- Build (Copy & Paste) Link - Allows you to paste the results page URL from a search you already set up using one of the IDX broker search pages to display results based on that search. Check out this article concerning the Build (Copy & Paste) Link option.
3. Finishing Touches
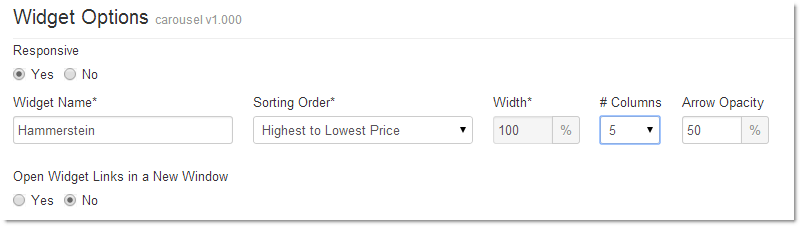
3.1 Give your widget a name by typing in the Widget Name field. We suggest naming it something that will help you identify what the widget displays and is unique compared to your other widgets.
3.2 Modify the settings for the widget to meet your needs. Below you will find an explanation of each setting.
-
Responsive – If set to Yes, the widget will automatically adjust its size when viewed on smaller screens. If set to No, the widget will not be mobile responsive.
-
Sorting Order – Determines the order in which the listings are displayed in the widget.
-
Width – This allows you to set the width of the widget on your page.
-
NOTE: This option is disabled if the Responsive option is set to Yes and the widget will adjust its size automatically to fit into the container it is placed in on your site.
-
NOTE: This option is disabled if the Responsive option is set to Yes and the widget will adjust its size automatically to fit into the container it is placed in on your site.
-
# Rows – Sets the number of rows the listings are displayed in. You can set between 1 and 10 columns.
-
NOTE: If the Responsive option is set to Yes, this option is disabled, and the number of rows will be determined by # Listings setting, the size of the container it is placed in, and the screen size of the user.
-
NOTE: If the Responsive option is set to Yes, this option is disabled, and the number of rows will be determined by # Listings setting, the size of the container it is placed in, and the screen size of the user.
-
# Columns – This setting will set the number of listings that show up in a single row. You can set between 1 and 10 columns.
-
# Listings – Stipulates the number of listings the widget will display on your page. The showcase widget can display a maximum of 100 listings.
-
NOTE: If the Responsive is set to No the # Listings field is disabled and the number of listings displayed with be determined by the number of rows and columns set. For example, if # Rows is set to 3 and # Columns is set to 3 the widget will display 9 listings.
-
NOTE: If the Responsive is set to No the # Listings field is disabled and the number of listings displayed with be determined by the number of rows and columns set. For example, if # Rows is set to 3 and # Columns is set to 3 the widget will display 9 listings.
-
Open Widget Links in a New Window – If set to Yes, when a user clicks on a property it will open the Details page for that listings in a new window.
- Display View All Results Link – When set to Yes, if there are more listings in the property set than are displayed in the widget a link will be displayed below the widget that users can click on to go to a page with a full list of the properties in that set.
3.3 Click Build Widget
4. Embedding the Widget
After clicking Build Widget the widget code will be appear. Copy the code and paste it into the HTML of your web page where you want the widget to be displayed.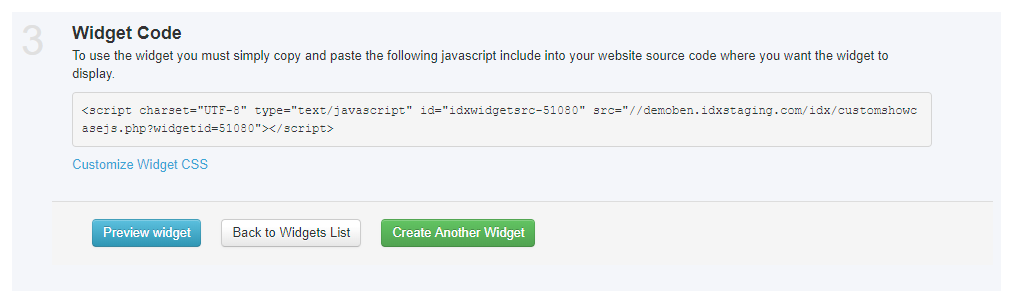
NOTE: If you do not know how to access or edit the HTML of your website or are unsure where to place the widget code within the HTML, please contact your web designer or website provider for assistance.
Are you using WordPress? If you build and manage your website using WordPress the IMPress for IDX Broker plugin makes it easy to embed widgets into your pages. For more information read our article on the IMPress for IDX Broker WordPress Plugin.
Editing the Widget
You can always go back and edit your Showcase Widget after creating it. For more granular customization you can also edit the search string by hand. To edit the widget, click on the Edit icon under the Tools column.
Multiple Instances
As with all widgets, if you intend to display this widget in more than one location on the same page (i.e. in main body of the page, and in the sidebar) you will need to create a second widget with the same criteria to place in the secondary location. Using the same widget more than once on the same page can cause display errors.