IDX Broker provides you with an extensive set of lead registration tools to manage the signup process for your site visitors. Your Force/Request lead registration rules are found in a couple of different areas of your IDX control panel. We'll go through each below.
Setting Force/Request Lead Registration Rules Globally by Category
To set global lead registration rules for all IDX pages, click Leads in the main menu, and Lead Registration in the submenu.

On this screen, you have a couple ways to choose how you want to set your force/request rules.
Simple
By default, you will be shown the Simple set of lead registration preferences. Here, you will see three options for your overall lead capture strategy - Conservative, Balanced, and Aggressive. Read the descriptions for each and click on the setting you would like. When you click Save Changes, lead registration rules will automatically be set for all of your IDX pages based on your choice.
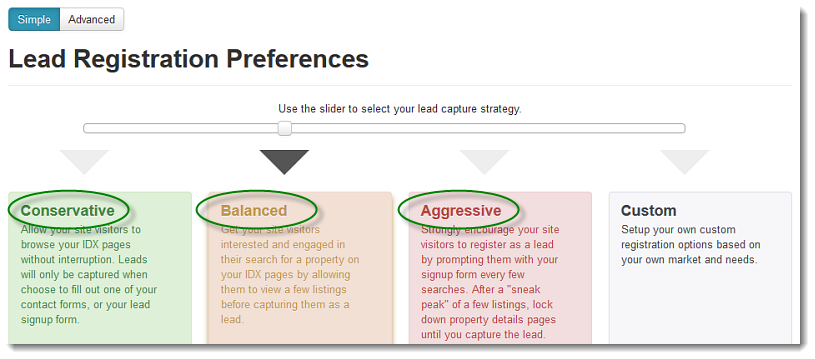
The set defaults for each level are as follows:
- Conservative - No force or request rules set on any pages.
- Balanced - Request (non-recurring) registration before they see Featured Properties and Featured Open Houses page. Force registration after 5 details pages.
- Aggressive - Request (recurring) after every 3 results pages for all types of results pages. Force registration after 3 details pages.
Advanced
For fine-tuned control over the global lead registration rules, go into the Advanced Lead Registration preferences by clicking the Advanced toggle at the top of this screen, or by clicking the Custom option, then Customize Settings. Once in Advanced mode, click the Global Registration Rules tab.
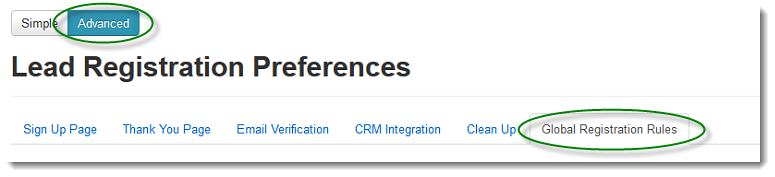
Here is a check box for both Request Registration and Force Registration for each of five main types of IDX pages: Search Pages, Map Search Pages, Results Pages, Details Pages, and Photo Galleries.
Once any check box is selected, further options become available for the Request or Force popup.
Request Registration Options
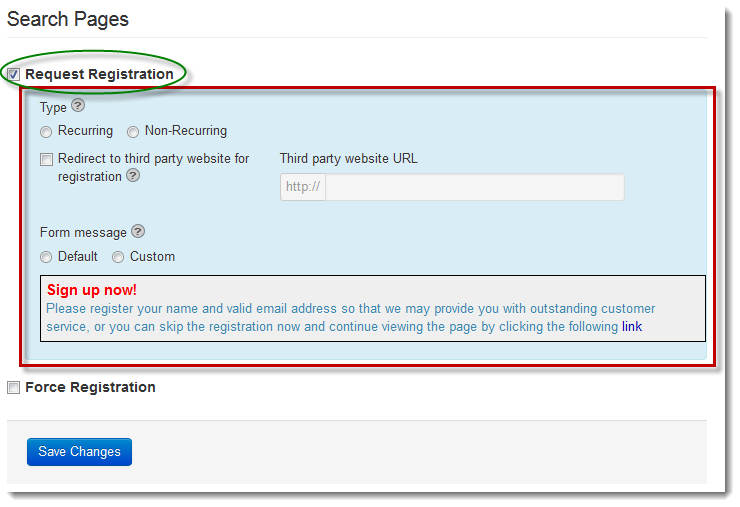
Type
- Recurring - Setting your Request Registration option to recurring will continue to display the signup form to your users after a number of times a page in the category is viewed. Specify this number of times using the box provided. For example, if you enter 5 into this box for Search Pages, your site visitors will see the Signup Request form after every 5 Search pages viewed. The signup form will continue to come up, over and over again after every 5 pages, until the site visitor registers.
- Non-Recurring - Setting your Request Registration option to Non-Recurring will display the signup form to your site visitors after a number of times a page in the category is viewed. Specify this number using the box provided. After the lead chooses to register or bypass the form, it will not show up again. For example, if you enter 5 into this box for Search Pages, your site visitors will see the signup form after 5 Search pages viewed. At this point, they can register, or bypass the form and continue browsing listings, and the signup form will not show up again for this category of pages.
Redirect to third party website
If you have a third party service that you wish to capture all of your lead registrations, instead of the IDX Broker system, you can replace the IDX Lead Signup form link. Any time the system would normally have brought up the IDX Lead Signup form, it will instead redirect the user to the link in this box.
Form Message
The grey box shows our default message that appears above the signup form on the Registration pop-up. You can customize this message by selecting Custom. This will expand a box where you can add additional content to the message section above the signup form. This editor includes many formatting options similar to a word processor. You can even insert images with the Insert/edit Image button![]()
If you choose to customize the accompanying message for Request pop-ups you will still see this sentence appearing after your custom message: "To skip registration, either close this modal window or click this link." This message can be hidden via adding this CSS to your Global CSS section:
#IDX-registrationDefaultMessage { display: none; }
Force Registration Options
Force Registration pop-ups have many similar options to the Request pop-ups. The difference is that the forced registration cannot be bypassed by the user. If they choose not to fill out the Force registration form then they are redirected to the homepage or the previous screen they were viewing.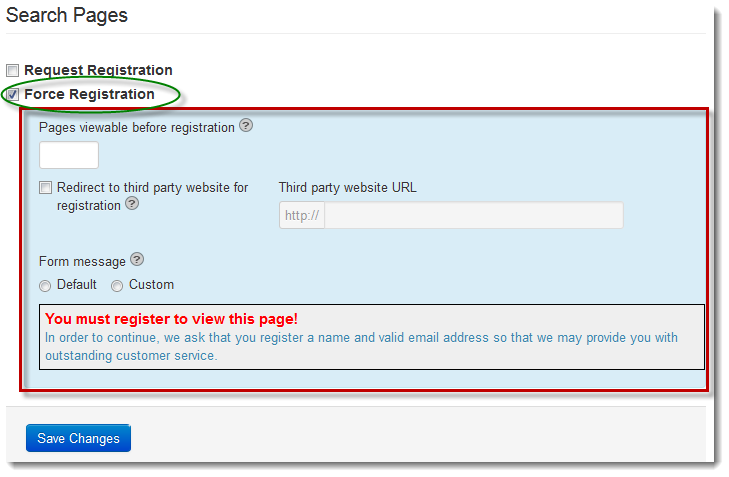
Pages Viewable Before Registration
This is the number of pages of this type (in the example above, it's search pages) that your visitor will be able to view before being stopped by a Force Registration pop-up. For example, if you put 10 in this box, then your visitors will be able to view 10 Search pages before getting the Force Registration pop-up.
Redirect to third party website
If you have a third party service that you wish to capture all of your lead registrations, instead of the IDX Broker system, you can replace the IDX Lead Signup form with a link to theirs. Any time the system would normally have brought up the IDX Lead Signup form, it will instead redirect the user to the link in this box.
Form Message
The grey box shows our default message that appears above the signup form on the Registration pop-up. You can customize this message by selecting Custom. This will expand a box where you can add additional content to the message section above the signup form. This editor includes many formatting options similar to a word processor. You can even insert links to images with the Insert/edit Image button![]()
Combining Request and Force Settings
You can combine these two types of pop-ups by staggering their display on the site. For instance, if you set your Request pop-up to show on every 3rd Search page, and set your Force pop-up to show after 10 Search pages, then your visitor will see a Request to register on the 3rd, 6th and 9th search pages (if they bypass each one) and be forced to register on the 10th search page they visit.
With So Many Choices - Where Should You Start?
We reviewed aggregate lead capture settings for all accounts and cross-referenced those settings against the average leads generated per day. While this is not a true scientific analysis, we have heard from several clients who have had very good results after modifying their previous or default settings to those described below:
- Request registration on Photo Gallery pages.
- Request registration after the 1st or 2nd Details Page view.
- Force registration after the 7th or 8th Details Page view.
When you are finished configuring your lead registration rules for each category, click Save Changes.
Setting Force/Request Lead Registration Rules for Individual IDX Pages
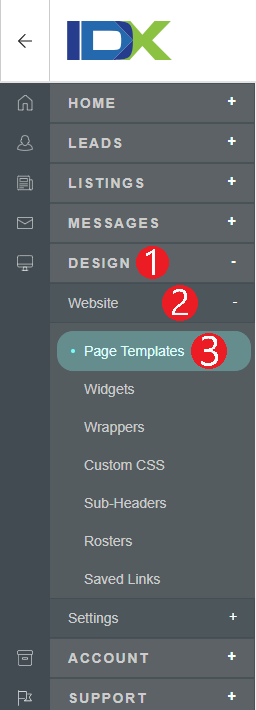
You can get even more specific with your lead registration preferences and customize them for individual IDX Broker pages within each category. For example, if you have 5 Search pages, you could have different lead registration preferences for each one. To do this, click Design in the main menu, Website in the submenu, then Page Templates.
Choose and page you would like to customize, and click the Edit link under the Preferences column.

From here, click the Lead Registration tab.
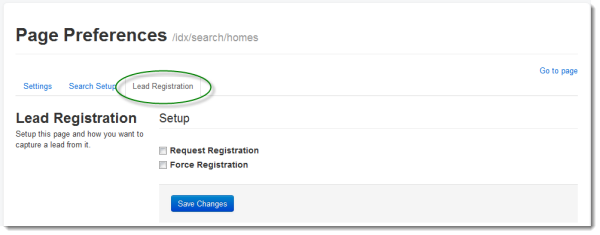
Here, you will see Force and Request registration checkboxes you can use to configure your lead registration settings for this page link only. When you are done, click Save Changes.
It may take some time and experimentation to find the lead capture settings that work best for your website and your market. Test these settings and you may be surprised at what IDX Broker can do for your business!